Saturday, August 4, 2012

How to Make Water Kefir Soda

Its a probiotic… its a carbonated drink… its Water Kefir! 

I started making this as part of my mission to get more probiotics in our diet and i LOVE it 
It’s also been fun to experiment with the different flavors and variations you can make!

Water Kefir Soda Supplies:

  • Glass Jar (1 quart or half gallon)
  • Wooden spoon for stirring (avoid metal)
  • Towel, cheesecloth or coffee filter to cover jar
  • or a rubber strainer (SMALL Hole one )
  • Rubber band

Water Kefir Soda Ingredients:

  • 3 TBSP (or more) of hydrated Water Kefir Grains 
  • 1/4 cup sugar per quart of water (I like organic unprocessed Rapadura sugar) Do not use honey!!
  • Non-chlorinated filtered water (If you use reverse osmosis, consider adding a few drops of trace minerals back in or sticking a rinsed pastured egg shell in for minerals) If you just have tap water, boil it to remove chlorine and cool before using

How To Make Water Kefir Soda:

  1. Dissolve the sugar in small amount of hot water.
  2. When sugar is dissolved, fill the rest of the jar with cool filtered water and make sure the water is not warm- it must be at room temp!
  3. Add the hydrated water kefir grains
  4. Cover with towel, cheesecloth, or coffee filter and rubber band to keep out insects or small children.
  5. Leave on the counter (preferably at 70-75 degrees) for 24-48 hours. The longer you leave it, the more sugar ferments out, so if you ware limiting carbs, I recommend 48 hours. Don’t leave longer than this! It can starve the grains!
  6. After 48 hours, strain the water kefir grains through a bamboo or mesh strainer (don’t use metal if you can help it!) pouring the liquid into another container. I use a half gallon jar for the first process and strain into two quart size jars.
  7. Restart the process by dissolving more sugar in water, adding cool water and adding Water Kefir Grains.
  8. To make the Water Kefir carbonated, pour a couple ounces of fruit juice into the strained water kefir you just strained. Or add fresh mushed fruit i love Mint and Lime in mine it taste like a Mojito YUM YUM YUM  
  9. Once you’ve added the juice or what ever you like to it , cover the jars tightly with an air tight lid and leave on the counter an additional 1-3 days before drinking or refrigerating.
  10. Repeat the process!

Monday, July 9, 2012

I am back

Happy Monday everyone i am back i am going to start my blogging again its been awhile i am going to start posting everyday

Wednesday, July 6, 2011

A GREAT SUMMER DRINK


Yesterday i used my Ice Tea Maker and my SIPLICIOUS Blueberry Green tea and today i used Earl Grey Cream can you say yummy and it's all good for you no SUGUR ADDED
All TeaRubs are on sale for the month of July
To Place your order contact me
siplicioustea@gmail.com

Thursday, June 23, 2011

Homemade Fruit Masks

APRICOTS AND CREAM MASK

1 cup (120 g) unsweetened dried apricots

1 cup (240 ml) warm water

2 tablespoons (10 g) nonfat milk powder

2 tablespoons (10 g) uncooked oats

YIELD: 2 1/2 cups (600 g)

1. Soak dried apricots in warm water until soft.

2. Place apricots with soaking water and the rest of the ingredients into the Vitamix container and secure lid.

3. Select Variable 1.

4. Turn machine on and quickly increase speed to Variable 10, then to High.

5. Blend for 30 seconds. 6. Apply to face and let mask dry, about 15-20 minutes. 7. Wipe off with a damp wash cloth.


ALMOND PEACH MASK

1/2 cucumber 1 tablespoon plain yogurt

1/2 cup (77 g) fresh sliced peaches

1 tablespoon raw almonds 1 tablespoon honey

YIELD: 1 1/2 cups (360 g)

1. Place all ingredients into the Vitamix container and secure lid.

2. Select Variable 1.

3. Turn machine on and quickly increase speed to Variable 10, then to High.

4. Blend for 30 seconds, using the tamper to press the ingredients into the blades.

5. Apply to face and let mask dry, about 15-20 minutes. 6. Wipe off with a damp wash cloth.

GOING GREEN SMOOTHIE

1/2 cup (120 ml) water 1 cup (160 g) green grapes

1/2 cup (75 g) fresh pineapple chunks, core included

1/2 medium banana, peeled

2 cups (60 g) fresh spinach, washed

1/2 cup (120 ml) ice cubes YIELD: 5 cups (1.2 l)

1. Place all ingredients into the Vitamix container in the order listed and secure lid.

2. Select Variable 1.

3. Turn machine on and quickly increase speed to Variable 10, then to High.

4. Blend for 45 seconds or until desired consistency is reached.

How to Store Vegetables/Fruit Without Plastic

How to Store Vegetables/Fruit Without Plastic

So you've got all these great fruits and vegetables and now we're going to help you keep them at their freshest with these tips. These tips are from the Berkley Farmer's Market which is a Zero Waste market! Here is a printable PDF of their original tip sheet. In the works here at Washington's Green Grocer is a switch from plastic bags (although we use as few as we can get away with, while still keeping your produce from getting battered on it's way to you) to only recyclable paper and reuseable cloth bags!

How to Store Vegetables without Plastic

Always remove any tight bands from your vegetables or at least loosen them to allow them to breathe.
Artichokes place in an airtight container sealed, with light moisture.
Asparagus‐ place them loosely in a glass or bowl upright with water at room temperature. (Will keep for a week outside the fridge)
Avocados‐ place in a paper bag at room temp. To speed up their ripening‐ place an apple in the bag with them.
Arugula‐ arugula, like lettuce, should not stay wet! Dunk in cold water and spin or lay flat to dry. Place dry arugula in an open container, wrapped with a dry towel to absorb any extra moisture.
Basil‐ is difficult to store well. Basil does not like the cold, or to be wet for that matter. The best method here is an airtight container/jar loosely packed with a small damp piece of paper inside‐left out on a cool counter.
Beans, shelling‐ open container in the fridge, eat ASAP. Some recommend freezing them if not going to eat right away
Beets‐ cut the tops off to keep beets firm, (be sure to keep the greens!)by leaving any top on root vegetables draws moisture from the root, making them loose flavor and firmness. Beets should be washed and kept in and open container with a wet towel on top.
Beet greens‐ place in an airtight container with a little moisture.
Broccoli‐ place in an open container in the fridge or wrap in a damp towel before placing in the fridge.
Broccoli Rabe‐ left in an open container in the crisper, but best used as soon as possible.
Brussels Sprouts‐ If bought on the stalk leave them on that stalk. Put the stalk in the fridge or leave it on a cold place. If they’re bought loose store them in an open container with a damp towel on top.
Cabbage‐ left out on a cool counter is fine up to a week, in the crisper otherwise. Peel off outer leaves if they start to wilt. Cabbage might begin to loose its moisture after a week , so, best used as soon as possible.
Carrots‐ cut the tops off to keep them fresh longer. Place them in closed container with plenty of moisture, either wrapped in a damp towel or dunk them in cold water every couple of days if they’re stored that long.
Cauliflower‐ will last a while in a closed container in the fridge, but they say cauliflower has the best flavor the day it’s bought.
Celery‐ does best when simply places in a cup or bowl of shallow water on the counter.
Celery root/Celeriac‐ wrap the root in a damp towel and place in the crisper.
Corn‐ leave unhusked in an open container if you must, but corn really is best eaten sooner then later for maximum flavor.
Cucumber‐ wrapped in a moist towel in the fridge. If you’re planning on eating them within a day or two after buying them they should be fine left out in a cool room.
Eggplant‐ does fine left out in a cool room. Don’t wash it, eggplant doesn’t like any extra moisture around its leaves. For longer storage‐ place loose, in the crisper.
Fava beans‐ place in an air tight container.
Fennel‐ if used within a couple days after it’s bought fennel can be left out on the counter, upright in a cup or bowl of water (like celery). If wanting to keep longer than a few days place in the fridge in a closed container with a little water.
Garlic‐ store in a cool, dark, place.
Green garlic‐an airtight container in the fridge or left out for a day or two is fine, best before dried out.
Greens‐ remove any bands, twist ties, etc. most greens must be kept in an air‐tight container with a damp cloth‐ to keep them from drying out. Kale, collards, and chard even do well in a cup of water on the counter or fridge.
Green beans‐ they like humidity, but not wetness. A damp cloth draped over an open or loosely closed container.
Green Tomatoes‐ store in a cool room away from the sun to keep them green and use quickly or they will begin to color.
Herbs- a closed container in the fridge to kept up to a week. Any longer might encourage mold.
Lettuce‐ keep damp in an airtight container in the fridge.
Leeks‐leave in an open container in the crisper wrapped in a damp cloth or in a shallow cup of water on the counter (just so the very bottom of the stem has water).
Okra‐ doesn’t like humidity. So a dry towel in an airtight container. Doesn’t store that well, best eaten quickly after purchase
Onion‐ store in a cool, dark and dry, place‐ good air circulation is best, so don’t stack them.
Parsnips‐an open container in the crisper, or, like a carrot, wrapped in a damp cloth in the fridge.
Potatoes‐ (like garlic and onions) store in cool, dark and dry place, such as, a box in a dark corner of the pantry; a paper bag also works well.
Radicchio‐ place in the fridge in an open container with a damp cloth on top.
Radishes‐ remove the greens (store separately) so they don’t draw out excess moisture from the roots and place them in a open container in the fridge with a wet towel placed on top.
Rhubarb‐wrap in a damp towel and place in an open container in the refrigerator.
Rutabagas‐ in an ideal situation a cool, dark, humid root cellar or a closed container in the crisper to keep their moisture in.
Snap peas‐ refrigerate in an open container
Spinach‐ store loose in an open container in the crisper, cool as soon as possible. Spinach loves to stay cold.
Spring onions‐ Remove any band or tie and place in the crisper.
Summer Squash‐ does fine for a few days if left out on a cool counter, even after cut.
Sweet peppers‐ Only wash them right before you plan on eating them as wetness decreases storage time. Store in a cool room to use in a couple a days, place in the crisper if longer storage needed.
Sweet Potatoes‐ Store in a cool, dark, well‐ventilated place. Never refrigerate‐‐sweet potatoes don’t like the cold.
Tomatoes‐ Never refrigerate. Depending on ripeness, tomatoes can stay for up to two weeks on the counter. To hasten ripeness place in a paper bag with an apple.
Turnips‐ remove the greens (store separately) same as radishes and beets, store them in an open container with a moist cloth.
Winter squash‐store in a cool, dark, well ventilated place. Many growers say winter squashes get sweeter if they’re stored for a week or so before eaten.

Zucchini‐ does fine for a few days if left out on a cool counter, even after cut. Wrap in a cloth and refrigerate for longer storage.


Tuesday, June 21, 2011

Coconut


Coconut oil
is high in lauric acid, which acts as an antibacterial and antiviral agent, helping the body fight diseases such as influenza. Lauric acid is also a cardiovascular protector, helping prevent high cholesterol and blood pressure. Coconut oil aids weight loss since it is a medium-chain triglyceride and helps maintain a healthy thyroid. Coconut oil also offers nutrition for hair and skin, keeping them clean and moisturized, and its antioxidant properties help prevent premature aging.
Coconut water is very low in fat, sugars and cholesterol, and high in potassium. Potassium helps restore electrolytes in the body, so coconut water is a great choice for rehydrating after a tough workout and a hot yoga class. Coconut water makes a great accompaniment to a post-workout Clean meal.
Coconut meat is taken from a mature coconut and used either fresh or dried in a number of dishes. A good source of fiber and manganese, coconut meat is good for a healthy digestive system, strong bones, normal blood sugar levels and even proper thyroid function. Make sure to choose unsweetened coconut meat to avoid added sugar.
Coconut milk, derived from the meat of a coconut, has antimicrobial properties. It combats fungi and bacteria in the gastrointestinal tract. Just keep in mind that coconut milk should be used in moderation, as its fat content is somewhat high. Add coconut milk to curry recipes or smoothies it adds some great flavours

Friday, June 17, 2011

JULYS HOST SPECIAL


These Tea Rubs are great i use them at least 3 times aweek on fish and chicken they are a MUST HAVE message me if you would like to place an order.

Thursday, June 16, 2011

BOB HARPER

http://www.youtube.com/watch?v=vrLgbz8vA3M&NR=1

Check this out i LOVE BOB HARPER i wish i could have him for a month of training

Friday, June 10, 2011

June Host Special


With the official start of summer just a few days away, the timing is perfect for National Iced Tea Day.
Chances are, it is already hot in your area. Today may serve as a good reminder to make and enjoy your first (of many) Iced Tea drinks of the season. Have it plain, add a little lemon, or sweeten it with sugar. Iced Tea is certainly a favorite summer cooler of millions of Canadians, and has never been easier to make than with our Bodum Iced Tea Jug and/or our Iced Tea Pouches. And best of all, tea is good for your health!
Serve up a jug of Strawberry Kiwi Iced Tea today :-)
CONTACT ME TO PLACE AN ORDER OR HOST A OUR favourite ice tea blend packaged in foil bags to ensure freshness.Place a pouch in water ,steep and sweeten for the perfect jug of ice tea. A great summer time refreshing drink .
Strawberry Kiwi
Ginger Peach
Tropical Green
Papaya Ginger
Contains 12 ice tea pouches 264g for $30.00
For more infor message me or send me an email
sipliciustea@gmail.com

Wednesday, June 8, 2011

Gluten Free Peanut butter chocolate cookies


Peanut Butter & Chocolate Thumbprint Macaroons

Just in case you missed this recipe over on Go Dairy Free, I thought I would add it here. I think this one is just one more shred of evidence that peanut butter and chocolate go with almosteverything.

Choc-oco-nut Thumbprint Macaroons

Recipe adapted from Vegan Desserts: Sumptuous Sweets for Every Season (spring section) by Hannah Kaminsky. Reprinted with permissions.

If you need a nut-free option, and seeds are okay, feel free to sub SunButter for the peanut butter. That stuff is pretty darn awesome. This recipe is Vegan, Dairy-Free, Egg-Free, Gluten-Free, Soy-Free, and optionally Nut-Free.

  • 2/3 Cup Peanut Butter (I used smooth, unsalted) + extra for the tops of the cookies
  • 1/3 Cup Plain, Unsweetened, or Vanilla Milk Alternative (I used So Delicious Unsweetened Coconut Milk Beverage)
  • 1/2 Cup Maple Syrup
  • 1/2 Cup Sugar
  • 2 Teaspoons Vanilla Extract
  • 1/4 Teaspoon Salt
  • 2/3 Cup Potato Starch
  • 5 Cups Unsweetened Shredded Coconut
  • Dairy-Free Chocolate Chips for topping, maybe a 1/2 Cup (I used Dream brand – the blue bag)

Preheat your oven to 350 degrees F, and line a couple of baking sheets with silicon mats (my choice) or parchment paper.

In a large bowl, blend the peanut butter, milk alternative, maple, sugar, vanlla, and salt until nice and smooth. Mix in the potato starch until smooth. Stir in the coconut by hand. It will get pretty darn thick.

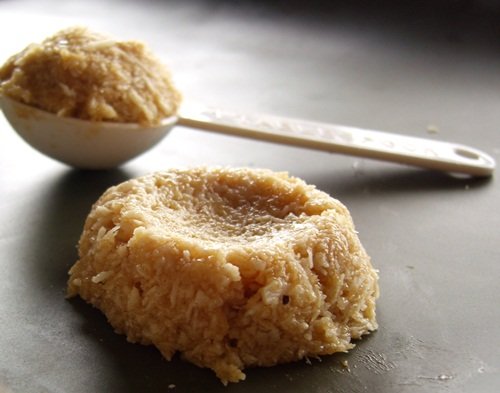
Now, I used about a tablespoon and a half of dough per cookie by pressing the dough into a tablespoon measuring spoon in a billowing, rounded style …

As an alternative, you can roll the dough into ping-pong sized balls. Place the cookie dough scoops or balls on the prepared baking sheets, and using either the back of the measuring spoon (may want to lightly spray it with oil) or your thumb, press a well in the center of each cookie.

Bake the cookies for about 10 minutes (I bake one sheet at a time and rotate them, or simply bake one batch and freeze the rest). Remove from the oven and place about 6 chocolate chips in each well. If the wells have filled in, just give them another gentle push down.

Bake for another 2 to 6 minutes. Mine needed more time, but Hannah’s sounded as if they finished more quickly. Remove from the oven and swirl in a wee dollop of peanut butter with the chocolate chips (they should now be melted and swirlable (new word, per me)).

Let those cookies cool for at least 5 or 10 minutes before attacking.

Makes about 40 cookies

Saturday, June 4, 2011


Peach Cobbler Chia Pudding

  • 1 medium peach, sliced
  • 1 T chia seeds
  • 1 T cashew butter
  • 1/4 C unsweetened vanilla coconut milk (I used So Delicious)
  • 1/2 tsp cinnamon

In a small bowl, mash up peach slices until they are a chunky puree. Stir in remaining ingredients. cover and refridgerate over night (or at least 2-3 hours).

In the morning, uncover and stir. Optional: microwave ~25 secs (I strongly recommend trying it hot!).

Note: If you aren’t using a vanilla-flavored milk, you may want to add vanilla extract.


Friday, June 3, 2011

KOMBUCHA TEA


Image #2
muchrooms for sale for $10.00

KOMBUCHA TEA


Kombucha Tea

Often referred to as a mushroom, kombucha is actually a living culture composed of yeasts, bacteria and cellulose living in a symbiotic relationship. During the fermentation process the kombucha culture is introduced to a medium (black tea sweetened with white sugar), and over time the yeasts break down the sugar and the bacteria digests yeast byproducts, resulting in kombucha tea.

Kombucha tea has a 2,000 year history as a tonic or elixir and is believed to have originated in China. According to anecdotal reports, kombucha tea offers many life enhancing and healing qualities including:

  • Increased energy
  • Clear skin
  • Improved hair and nail quality
  • Weight loss and reduced fluid retention
  • Arthritic pain relief
  • Improved digestion
  • Detoxification
  • Allergy reduction
  • Assists with addiction
  • Speeds healing
  • Improved mental health
  • Regulation of blood glucose
  • Reduces PMS
  • Improved immunity

Like many other alternative therapies, I have not found a formal study on the health benefits of kombucha consumption, so there is no “proof” of its healing qualities. In my own practice I drink about 4-6 ounces of kombucha in the morning and afternoon, and I believe it has enhanced my digestion and overall health. I don’t think of it is a cure-all but rather a component of a whole foods diet.

While mass-produced kombucha tea products are increasingly available at natural food stores, you’ll save money and enjoy a better product if you brew it at home. The first step in the brewing process is to secure a kombucha culture or “scoby” (pictured below). Kombucha cultures naturally regenerate throughout the fermentation process, so if you know someone who brews kombucha at home they will often have an extra culture to share.

Here is what you will need to set up your kombucha tea brewery:

Equipment:

  • 4 quart stainless steel pot
  • Glass measuring cup
  • Wooden spoons
  • 4 quart glass container
  • 1 clean cotton dishtowel
  • Rubber band
  • 4 24-ounce ball jars with lids

Ingredients:

  • 4 organic black tea bags
  • 3 quarts of filtered water
  • 1 cup organic white sugar
  • 1 kombucha culture
  • ½ cup starter liquid

Preparation:

  1. Create a clean work area and thoroughly wash your hands and brewing equipment.
  2. Bring 3 quarts of water to a low boil and then stir in the organic white sugar.
  3. When the water has come to a boil, turn of the heat source and remove the pot from the burner. Add organic black tea bags and steep until cool
  4. Remove the tea bags
  5. Pour the tea into the glass container and add the starter liquid (kombucha from previous batch or the liquid that arrived with the culture).
  6. Place the kombucha culture on top of the tea with the smooth shiny layer facing up.
  7. Cover the fermentation container with a cloth and secure it with a rubber band or string.
  8. Place the fermentation container in a warm, quiet, dim place and brew for 7-10 days (depending on the ambient temperature).
  9. Remove the white cloth from your glass container. Your “mother” culture will probably produced a “baby”; remove both cultures from the bowl and separate the baby from the mother by pulling apart gently. Put both cultures in a separate glass bowl and add newly harvested tea to cover.
  10. Pour the remaining kombucha tea from your glass container into ball jars and store in refrigerator.
  11. Allow kombucha tea to chill and it is ready to drink. The kombucha tea will continue to ferment while in the ball jars (at a slightly slower speed if refrigerated) so the taste will change over time.
  12. Start the process again right away in order to preserve the cultures (you can make two separate batches with the “mother” and “baby” cultures).

Friday, August 27, 2010

Yoga Tea

Yogi tea recipe.

A good word of advice,play around with the flavours,all our tastes are different.The vital ingredients are:

  1. ginger root-approx 8cm peeled and chopped into slices
  2. cardamon-4/5
  3. black cloves-3/4
  4. black peppercorns-3/4
  5. cinnamon stick
  6. one large pan of water
  7. loose black tea or a black tea or green tea tea bag.Adding tea is optional

Add all the ingredients to the pan of water,except the tea if you are using it and cook until boiled.When the liquid starts to boil bring it down to a simmer and then add the tea.Leave to simmer for 10 minutes and then ‘voila’ you have the perfect Yogi Tea.Grab your favourite mug and pour.You may want to add milk and or sugar or honey to taste.

Wednesday, August 25, 2010

FREE YOGA IN THE PARK

Hey everyone come check this out
Great Time Great Instructors Great place just all around great for body and mind
http://www.yogaintheparkrd.com/

Tuesday, August 24, 2010

TEAS

Hey all i am a SIPLICIOUS TEA consultant and i would love to show you some of the teas . You can book a party or just do book party what ever works best for you or even become a consultant If you would like more info please email me and i will get back
Thanks Bev
siplicioustea@gmail.com

Wednesday, November 4, 2009


Graham Crackers (Gluten Free)


Ingredients

Directions

  1. In a large bowl, whisk together flours, sugar, cinnamon, baking powder, xanthan gum, baking soda and salt.
  2. Cut in butter using a pastry cutter or two knives until it resembles cornmeal.
  3. Stir in cold water, honey and vanilla. Dough should form a ball. If dough is too dry, add more cold water a tbsp at a time.
  4. Preheat oven to 325 degrees.
  5. Get out two cookie sheets and cover with wax or parchment paper. Spray lightly with non-stick cooking spray.
  6. Gather dough into a ball and divide in half. Using a lightly floured cloth covered rolling pin (I use sweet rice flour), roll half of the dough into a rectangle on one of the cookie sheets to about a 1/8" thick. Repeat with the other half.
  7. Score dough with a pizza cutter (or knife) into desired shapes and prick all over with a fork. (I like to use plastic forks for pricking since they tend to make rounder and thicker holes.).
  8. Very lightly sprinkle all over with sugar.
  9. Bake for 20 minutes or until golden brown and starting to harden. Let cool for 5 minutes before breaking apart. (If not fully crispened, put back in turned off warm oven until crisp.).

Tuesday, September 15, 2009

Quinoa Salad with Herbs, Feta and Pomegranate

Quinoa Salad with Herbs, Feta and Pomegranate Click here for a printer friendly version of this recipe.

1 cup quinoa
2 cups chicken stock or water
1 cup baby peas
1/2 cup crumbled feta cheese (optional)
1/2 red onion, chopped
1/2 red bell pepper, diced
1/2 cup mixed chopped fresh basil, flat-leaf parsley, and cilantro leaves
2 tablespoons chopped fresh tarragon leaves
1/2 cup pomegranate seeds
1/4 cup pomegranate juice
1 tablespoon orange juice concentrate, thawed
1 tablespoon white wine vinegar
2 teaspoons freshly squeezed lemon juice
1 tablespoon olive oil
Salt and freshly ground black pepper

  1. Spread the quinoa out on a dish and pick out any pieces of grit. Rinse the grains thoroughly in a fine-mesh sieve and drain well.
  2. In a saucepan over high heat, bring the stock to a boil, stir in the quinoa, and return to a boil. Decrease the heat to low, cover, and simmer for about 15 minutes, or until all the liquid is absorbed. The quinoa should be tender but not mushy. Remove from the heat and fluff up the quinoa with a fork. Transfer to a serving bowl and let cool.
  3. While the quinoa is cooking, cook and cool the peas. Place the peas and enough water to cover them in a saucepan. Bring the water to a boil, then decrease the heat to low and simmer for about 5 minutes. Remove from the heat to cool.
  4. Add the cooled peas, feta, onion, bell pepper, mixed herbs, tarragon, and pomegranate seeds to the cooled quinoa. Toss to mix well.
  5. In a small bowl, whisk together the pomegranate juice, orange juice concentrate, vinegar, lemon juice, and olive oil. Season to taste with salt and pepper. Set aside.
  6. Just before serving, whisk the dressing again, pour over the salad, and toss.

Thursday, September 10, 2009

Homemade Nut Milk Yogurt

Homemade Nut Milk Yogurt
By Sueson Vess

If you can tolerate nuts, this yogurt is a nice alternative to other dairy-free yogurt products. Homemade nut milk yogurt is thinner than commercial versions.

1⅓ cups whole raw almonds, hazelnuts or macadamia nuts
Water, enough to cover nuts overnight
3 cups water
1-2 tablespoons honey or agave nectar or 2 dates
⅛ teaspoon nondairy yogurt starter (per quart of yogurt)

  1. Soak nuts in water overnight (8 to 12 hours) in a glass container. Drain. Place drained nuts in a blender and add enough water to make 1 quart. (Check the capacity of your blender and yogurt maker. You may need to blend in two batches.) Add 2 tablespoons honey and blend for 2 to 3 minutes.
  2. Pour nut milk through a fine sieve, one cup at a time. You can squeeze out more liquid if you use a tea towel and twist it firmly or use a nut milk bag.
  3. Heat nut milk to 160 degrees (This step is optional; however heating the nut milk will keep the yogurt from separating and make for a thicker final product.).
  4. Cool nut milk to 105 degrees. This step is very important as hot liquid will kill yogurt starter.
  5. Add heaping ⅛ teaspoon of yogurt starter per quart of nut milk. Blend thoroughly with a whisk.
  6. Place nut milk in yogurt maker or in dehydrator at 95-105 degrees. Leave lids off individual yogurt containers during fermentation to avoid condensation on lids that may thin the finished yogurt. Cook/ferment for 8 hours.
  7. Place yogurt in the refrigerator overnight where it will continue to thicken a bit more.

TIP: For thicker yogurt, strain finished yogurt into a bowl lined with cheese cloth to remove excess liquid. Let drip for about an hour, or longer for thicker yogurt.

Wednesday, August 26, 2009

Flourless Chocolate Cakes

wow i made this great flourless chocolate cake last night to take with us for a snack in the limo on are way to ACDC tonight and had to taste it first and all i can say is yummy . Will post the recipe tomorrow when i have more time.

Saturday, August 22, 2009

Gluten-Free Baguettes

This recipe makes marvelous gluten-free bread in just two hours. Slice and feast! Use baguettes for garlic bread, crostini, submarine sandwiches, baguette pizza and even French toast.

3 cups Gluten-Free, High-Protein Flour Blend
1 tablespoon cornmeal, more for dusting
2 teaspoons sugar
1 tablespoon xanthan gum
2 packages (4½ teaspoons) rapid yeast
¾ teaspoon salt
1¼ cups warm water
1 teaspoon cider vinegar
2 eggs, room temperature
3 tablespoons extra-virgin olive oil
Preheat oven to 375 degrees. Line a double baguette form with foil, extending foil up the sides by 2 inches. Lightly grease foil and sprinkle with cornmeal. Alternatively, make two baguette-shaped forms (each measuring 2 inches wide, 4 inches high, 14-16 inches long), using a double thickness of heavy-duty foil, dull side out; lightly grease and sprinkle each with gluten-free flour or cornmeal and place on a cookie sheet.Mix dry ingredients together in the bowl of a stand mixer.
In a separate bowl, whisk together the water, vinegar, eggs and oil. Add to dry ingredients.Using the beater or paddle of your mixer (not the whisk), beat mixture on low speed until well blended. Then turn the speed up and beat for 5 minutes on medium-high speed.With oiled hands or oiled plastic wrap, divide dough in half and shape into 2 baguettes. Place in prepared pan and cover with lightly greased plastic wrap. Let rise in a warm place for 20 to 30 minutes.Spritz dough with water. Place in preheated oven and bake for 30 minutes or until done. Bread is done when internal temperature reaches 200 degrees

High-Protein Flour Blend
This nutritious blend works best in baked goods that require elasticity, such as wraps and pie crusts.
1¼ cups bean flour (your choice), chickpea flour or soy flour
1 cup arrowroot starch, cornstarch or potato starch
1 cup tapioca starch/flour
1 cup white or brown rice flour

Each cup contains 588 calories, 3g total fat, 0g saturated fat, 0g trans fat, 0mg cholesterol, 128g carbohydrate, 24mg sodium, 6g fiber, 11g protein

Wednesday, August 19, 2009

Gluten Free Play Dough

In a Gluten-free household store bought Play Dough is such a risky thing to have around, especially when toddlers are involved. This recipe is safe, very easy, and so much fun to make too! If you are used to Gluten-free baking, you will probably have all the ingredients in the house already The Gluten free Play Dough looks and handles just like 'normal' Play Dough, so kids won't notice the difference. It keeps well for months when stored in an airtight container. This recipe was found at Coeliac UK.
Ingredients

1 cup rice flour
1 cup cornflour
1 cup salt
4 teaspoons cream of tartar
2 tablespoons vegetable oil
2 cups water
food coloring
Directions

1.Mix base ingredients in a large measuring pitcher.
2.Heat one cup of the resulting white mixture in a small saucepan. add some food colouring (a few drops at a time) to reach the desired colour.
3.Stirring constantly with a wooden spoon, cook over low heat for about 5 minutes. Consistency will be very runny at first but once it starts to thicken mixture will firm up quite fast.
4.Remove from heat and knead to remove lumps (if any).
5.Repeat with rest of mixture. 1 cup of the mixture will yield approximately 1 small canister of Gluten-free Play Dough (like the standard sets with a few colours you buy in the store).